Ever wondered about the precise dimensions of a Roblox stud and why it matters so much in game development Understanding stud measurements is crucial for creating immersive environments and accurate scaling within your Roblox experiences This guide delves into the fundamental unit of measurement in Roblox Studio providing builders and scripters with essential knowledge for precision building and game design From character movement to object placement the stud dictates many aspects of gameplay and visual consistency Discover how to leverage stud knowledge to elevate your building skills and create more professional looking games for the thriving Roblox community This informational resource aims to clarify common misconceptions and empower creators to build with confidence and accuracy making your creations stand out.
Welcome to the ultimate living FAQ about the Roblox Stud, meticulously updated for the latest patches and Studio features! If you've ever pondered the exact size of your virtual world's foundational unit or how it impacts your game, you've landed in the perfect spot. We're diving deep into everything 'stud' related, from beginner queries about its basic dimensions to advanced insights on how it intertwines with physics, scripting, and large-scale game optimization. This guide aims to be your one-stop resource, arming you with the knowledge to build, script, and design with unparalleled precision and confidence. Get ready to demystify the humble stud and elevate your Roblox development game!
Understanding the Roblox stud is not just about knowing a number; it's about grasping the core language of spatial reasoning within Roblox. This knowledge empowers you to create more immersive, functional, and visually appealing experiences for players. Whether you're constructing intricate builds, coding complex mechanics, or simply trying to get your character to fit through a doorway without clipping, the stud is your constant companion. We've gathered the most common and insightful questions from the community, providing clear, actionable answers to help you navigate the fascinating world of Roblox dimensions. Let's get into it!
Beginner Questions
What is the standard measurement of a Roblox stud?
The standard measurement of a Roblox stud is conventionally considered to be one real-world foot. This 1 stud = 1 foot equivalence serves as a foundational guide for developers to maintain consistent scale. For example, a typical Roblox character is approximately 5 studs tall, which corresponds logically to a 5-foot human, making the virtual world feel relatable and navigable for players.
Why is understanding stud dimensions important for new Roblox builders?
Understanding stud dimensions is crucial for new builders because it ensures consistency and proper scaling throughout their creations. Without this knowledge, objects can appear disproportionate, characters might struggle with navigation due to incorrect door heights or jump distances, leading to a frustrating player experience. It helps create professional-looking and functional environments from the ground up.
How do I check the size of an object in studs in Roblox Studio?
You can easily check an object's size in studs within Roblox Studio by selecting the object and navigating to the 'Properties' window. Under the 'Part' section, you'll find the 'Size' property, which displays the dimensions (X, Y, Z) of your selected part in studs. You can also directly input values here to precisely control its dimensions.
What is the typical size of a character in Roblox measured in studs?
A typical Roblox character is generally around 5 studs tall. This approximation helps maintain the 1 stud = 1 foot convention, making characters feel like average human size within the game world. Builders often use this 5-stud height as a baseline when designing environments like doorways, ceilings, and furniture to ensure proper character fit and movement.
Builds & Classes
What are good stud dimensions for creating a standard doorway?
For a standard, comfortable doorway in Roblox, aim for dimensions of approximately 3-4 studs wide and 7-8 studs tall. These measurements allow characters to pass through easily without feeling cramped or clipping. A 1-stud thickness for the walls around the doorway also provides a sturdy and realistic appearance.
How do I ensure consistent scaling across all my builds using studs?
To ensure consistent scaling, establish a clear stud-to-real-world ratio early in your project, typically 1 stud = 1 foot, and strictly adhere to it. Use Studio's grid snap settings (e.g., 1 stud for movement, 0.25 for scaling) and regularly compare new assets to existing ones or a reference character. Creating a 'scale guide' part that's 1x1x1 stud can also serve as a quick visual reference for new parts.
Can I use fractional studs for intricate details, and how precise can I get?
Yes, absolutely! Fractional studs are essential for intricate details. You can be incredibly precise, often down to 0.001 studs or even smaller, by manually typing values into the 'Size' property. For practical building, common fractions like 0.125 or 0.25 studs are frequently used for thin walls, trims, or small gaps, adding a high level of polish and realism to your creations.
Multiplayer Issues
How does inconsistent stud scaling impact multiplayer gameplay experience?
Inconsistent stud scaling severely impacts multiplayer gameplay by creating frustrating and unfair experiences. Players might find some doorways impassable, jump heights unpredictable, or collision detection unreliable. This can lead to players getting stuck, falling through the map, or having an uneven playing field, breaking immersion and making the game less enjoyable for everyone involved.
Endgame Grind
How can understanding stud dimensions help in designing engaging endgame content?
Understanding stud dimensions is vital for designing engaging endgame content by allowing for precise environmental challenges and intricate level design. For instance, creating complex puzzle rooms, challenging parkour sections, or precise combat arenas all rely on accurate stud measurements for optimal difficulty and player flow. It ensures that advanced mechanics feel fair and deliberate, rather than accidental or buggy.
Bugs & Fixes
My character keeps getting stuck or falling through parts; could it be related to stud size?
Yes, character issues like getting stuck or falling through parts are very often related to incorrect stud sizing or positioning. Parts that are too thin (less than 0.2 studs) or improperly aligned in stud increments can create gaps or collision inaccuracies. Ensure your parts have adequate thickness and are perfectly snapped to the grid, preventing collision detection failures. Adjusting the part's size to be slightly larger or using solid modeling techniques can often resolve these issues.
Tips & Tricks
What's a useful trick for quickly gauging stud distances in Studio?
A super useful trick for quickly gauging stud distances is to use the 'Move' tool's grid snap. Set your grid snap to 1 stud, then drag any part from one point to another. The transparent ghost image of the part will help you visually count the studs. Alternatively, insert a 1x1x1 stud part as a temporary ruler and duplicate it to measure larger distances visually.
Are there any plugins that help with stud precision and measurement?
Absolutely! Several community-made plugins are excellent for enhancing stud precision and measurement. 'Build v4' and 'F3X Building Tools' (often called GapFill and ResizeAlign) are popular choices that offer advanced snap, align, and resizing features, often down to minute fractional studs. These plugins streamline workflows, making it easier to achieve pixel-perfect (or rather, stud-perfect) alignment and sizing in complex builds.
How do I optimize large builds for performance while maintaining stud accuracy?
To optimize large builds while maintaining stud accuracy, focus on reducing part count without sacrificing detail. Use larger parts for broad surfaces instead of many small ones. Leverage unions and meshes (carefully) to combine multiple parts into a single, more efficient object. Also, consider streaming enabled and level-of-detail (LOD) techniques for distant objects, reducing the rendering load while preserving accurate stud representation up close.
Most Asked Questions about How Big is a Roblox Stud
What is the core unit of measurement in Roblox?
The core unit of measurement in Roblox is the 'stud'. It serves as the foundational metric for all dimensions, distances, and object sizes within Roblox Studio and the games themselves. Understanding the stud is essential for precise building, accurate scaling, and consistent game design, impacting everything from character movement to environmental layout.
How does the Roblox stud size relate to character height and scale?
The Roblox stud size typically relates to character height and scale by a convention where 1 stud equals 1 real-world foot. Consequently, a standard Roblox character is approximately 5 studs tall. This provides a natural and relatable sense of scale for players, influencing how environments, objects, and player-created elements are dimensioned to feel proportionate and immersive.
Can I change the definition of a 'stud' in Roblox Studio?
No, you cannot fundamentally change the engine's definition of a 'stud' as its core unit of measurement. The 1-stud unit is hardcoded into Roblox's physics and rendering systems. However, developers can establish their own internal 'scale convention' where, for example, 1 stud visually represents a different real-world measurement within their specific game, requiring consistent application.
What impact does stud thickness have on game physics and collisions?
Stud thickness significantly impacts game physics and collisions. Parts that are too thin (e.g., less than 0.2 studs) can sometimes lead to collision detection failures, causing characters or objects to clip through them. Proper stud thickness ensures reliable collision boxes, preventing glitches and allowing for predictable interactions within the game world, crucial for stable gameplay.
What is the best way to convert real-world measurements to Roblox studs?
The best way to convert real-world measurements to Roblox studs is by using the widely accepted convention of 1 stud = 1 foot. So, if a real-world object is 10 feet long, you would make it 10 studs long in Roblox. For metric measurements, convert meters to feet first (1 meter is approximately 3.28 feet) then apply the 1:1 stud-to-foot ratio.
How do I create smooth curves and intricate shapes using stud-based building?
Creating smooth curves and intricate shapes using stud-based building involves combining multiple parts with small fractional stud increments and leveraging tools like GapFill, ResizeAlign, and Archimedes. By rotating parts slightly and using very small stud increments (e.g., 0.125 or 0.001 studs), you can create the illusion of smooth curves and highly detailed forms, far beyond simple blocky shapes.
Why do some parts appear misaligned even when using stud snap?
Parts can sometimes appear misaligned even with stud snap if their initial position or rotation was slightly off-grid, or if you're using different snap increments for moving versus rotating. Ensure all parts are both snapped to the grid for position and aligned on whole or consistent fractional angles. Using plugins like 'Align' or 'Stravant's GapFill & Extrude' can also help correct subtle misalignments that visual snap might miss.
Still have questions? Dive into our related guides on advanced Roblox Studio techniques or explore community forums for more expert tips and tricks!
Ever found yourself staring at a block in Roblox Studio, asking, "Just how big *is* a Roblox stud, anyway?" You're definitely not alone! It's one of those foundational questions that every aspiring Roblox developer or curious player eventually bumps into. Understanding the humble stud is like learning the alphabet of Roblox; it unlocks a whole new level of precision and control over your creations. In the vast, blocky universe of Roblox, every single piece, every character, and every interaction is governed by this tiny, yet mighty, unit of measurement. It's the silent hero behind seamless gameplay and visually coherent worlds. Without a firm grasp on the stud, your builds might end up feeling a little... off. So, let's grab a virtual coffee and really dig into what makes the Roblox stud tick, why it's so important, and how you can master it for your own amazing projects in the current gaming landscape.
We're talking about the core of all things scale in Roblox, where every decision you make regarding size and distance directly impacts the player experience. Whether you're designing an intricate obstacle course, a sprawling city, or a cozy virtual home, knowing your studs is paramount. It ensures that your characters don't feel like giants in a dollhouse or ants in a cathedral. This foundational knowledge isn't just for veteran developers either; new builders can instantly improve their creations by simply understanding this basic concept. Let's break down the stud into digestible pieces, ensuring you're ready to build worlds with impeccable precision and flow.
Beginner / Core Concepts
For those just stepping into the exciting world of Roblox Studio, getting a handle on the basics is key. The stud is your first language here.
1. Q: What exactly is a Roblox stud and what does it represent in the game world?A: I get why this confuses so many people when they first start! A Roblox stud is the fundamental unit of measurement within Roblox Studio and games. Think of it as the basic building block for all dimensions. Crucially, one Roblox stud is generally considered to be equivalent to one foot in the real world, though this is a convention for player scale rather than a strict physics rule. This equivalency helps developers intuitively scale their environments and objects, ensuring players feel appropriately sized within the virtual spaces. It's the standard metric for everything from character height to the length of a bridge, providing a consistent framework. Without this consistent unit, designing harmonious and playable spaces would be incredibly challenging. You've got this!
2. Q: Why is understanding the Roblox stud size so important for new builders and game creators?A: This one used to trip me up too, but it's vital for consistency and player experience. Understanding the Roblox stud size is absolutely critical because it dictates scale across your entire game. If you don't grasp it, your characters might clip through walls, jump too high for their environment, or objects could look comically out of proportion. It affects everything from character movement speed to the perceived size of rooms. For instance, a doorway that's too short in studs will frustrate players, while one too tall might look unnatural. By knowing the stud, you can create intuitive, navigable, and visually pleasing worlds where everything just feels right. It truly elevates your game from amateur to polished. Try incorporating this knowledge into your next build and see the difference!
3. Q: How does the Roblox stud relate to real-world measurements or common scales?A: It's a great question because it helps us connect the virtual to the familiar! The Roblox stud is conventionally equated to one real-world foot. This 1 stud = 1 foot relationship is a widely accepted guideline among developers to maintain a relatable sense of scale for players. For example, a typical Roblox character is about 5 studs tall, which translates nicely to a 5-foot human figure. This convention isn't enforced by the engine as a physical law, but rather serves as a crucial design standard. It allows builders to create environments like houses, cars, or landscapes that feel natural and proportionate to a player's real-world expectations. Sticking to this mental conversion makes scaling objects and spaces much more intuitive for you. Keep practicing with it!
4. Q: Where can I find the precise dimensions of a stud within Roblox Studio?A: Finding those precise dimensions is simpler than you might think once you know where to look! When you insert a Part into Roblox Studio, its default size is 4 studs x 1 stud x 2 studs (width, depth, height). You can inspect and modify a part's dimensions using the 'Properties' window. Select any part, and in the 'Properties' window, locate the 'Size' property. Here, you'll see three values (X, Y, Z) which correspond to the part's dimensions in studs. You can directly input numerical values here to precisely control the size of any object down to fractions of a stud. This level of control is essential for fine-tuning your builds and ensures everything lines up perfectly. Don't be afraid to experiment with those values tomorrow! You've got this!
Intermediate / Practical & Production
Now that you've got the basics down, let's explore how the stud affects practical building and game production. This is where the rubber meets the road!
1. Q: How does scaling objects using studs impact character movement and interaction within a game?A: This is where the magic of consistency really shines in game design! Correctly scaling objects with studs directly affects how characters move and interact with your world. If a floor is too low or a wall too thin, characters might clip through, creating a frustrating and immersion-breaking experience. Conversely, if stairs are too steep or jumps are too far in stud units, players could struggle to navigate, making gameplay tedious. The stud size determines jump height, walk speed, and how collision detection works, so precise scaling ensures smooth transitions and functional obstacles. It creates a predictable environment where players can confidently navigate and enjoy the experience without constant glitches. Making these adjustments will greatly improve player satisfaction. Give it a shot!
2. Q: What are common stud-based measurements for building things like doors, windows, and walls?A: This is a fantastic question for anyone aiming for realistic and functional builds! While there's no strict rule, many experienced builders follow common stud-based measurements for standard architectural elements. For instance, a typical door might be 3-4 studs wide and 7-8 studs tall to accommodate a player. Windows often range from 2-4 studs wide and 3-6 studs tall, depending on the desired aesthetic. Walls are frequently 1 stud thick for structural integrity without being excessively bulky, though sometimes 0.5 stud thickness is used for interior walls. These are guidelines, not rigid laws, but they provide a solid starting point for creating spaces that feel natural and navigable for players. You'll develop your own style over time, but these benchmarks are super helpful. Keep building!
3. Q: When should I use fractional studs (e.g., 0.5 or 0.25 studs) versus whole studs in my builds?A: I totally get why this can feel a bit daunting at first, but using fractional studs is a game-changer for detail! You should absolutely use fractional studs when you need finer precision or want to add intricate details that whole studs can't capture. For example, railings, decorative trim, thin panels, or small gaps often require 0.5 or even 0.25 stud increments to look just right. While whole studs are great for foundational structures like walls and floors, fractional studs allow for that extra layer of polish and realism that makes your builds truly stand out. It prevents that blocky, overly simplistic look and adds a professional touch to your game. Don't shy away from these smaller increments; they unlock incredible design possibilities. Keep experimenting!
4. Q: Who benefits most from a deep understanding of Roblox stud measurements?A: Honestly, *everyone* involved in creating on Roblox benefits, but especially scripters and advanced builders! Scripters need to understand stud measurements when dealing with player movement, raycasting, physics, and positional data in their code. Builders rely on it for structural integrity, aesthetic appeal, and functional design, ensuring consistent scaling across their projects. Game designers benefit by understanding how stud dimensions impact player experience, level design, and overall game flow. Even asset creators, who design models and meshes, need to consider stud scale for compatibility. Essentially, anyone aiming to produce high-quality, polished, and functional Roblox experiences will find a deep understanding of studs incredibly valuable. It's the language of precise creation! You're on your way to mastery.
5. Q: How do different Roblox tools, like the 'Move' or 'Scale' tool, utilize stud increments?A: This is a great practical question that streamlines your building process! Roblox Studio's 'Move' and 'Scale' tools primarily operate on stud increments by default, which is super helpful for aligning objects. When you select the 'Move' tool, you'll see a 'Snap to Grid' setting at the top of the Studio window, typically set to 1 stud. This means your parts will move in whole 1-stud increments, ensuring perfect alignment. You can change this to smaller fractions (like 0.125 or 0.25 studs) for more precise adjustments. Similarly, the 'Scale' tool allows you to resize parts, often in 0.125 or 0.25 stud increments, though you can disable snapping for free-form scaling. Mastering these grid settings is key to efficient and accurate building. It's a small tweak that makes a huge difference tomorrow! You've got this.
6. Q: What are the common pitfalls or mistakes developers make regarding stud scaling and how to avoid them?A: It's easy to fall into some common traps, but knowing them helps you steer clear! A big pitfall is inconsistent scaling, where different parts of your game have different stud-to-real-world ratios, leading to a jumbled, unprofessional look. Another is ignoring player scale, resulting in doors that are too short or rooms that feel claustrophobic for the character. Developers might also forget that collision boxes are tied to stud dimensions, causing players to get stuck or fall through floors. To avoid these, establish a consistent scale (e.g., 1 stud = 1 foot) early on and stick to it. Always test your game from a player's perspective, checking movement and interaction with objects. Regularly review your builds for proportionality and functionality. Consistent practice will make these second nature. You'll master it!
Advanced / Research & Frontier
For those looking to push the boundaries, understanding studs on a deeper, more technical level is essential. Let's get into the nitty-gritty!
1. Q: How does the physics engine in Roblox Studio interpret stud measurements for collisions and forces?A: This is where things get really fascinating for advanced developers! Roblox's physics engine, built on Havok, interprets stud measurements as its primary unit for all calculations involving collisions, forces, and rigid body dynamics. When you set a part's size in studs, the engine uses these dimensions to calculate its bounding box and mass properties. Forces like gravity, impulses, and constraints are applied based on these stud-defined properties. For instance, a larger part in studs will have a proportionally larger mass (if density is consistent), influencing how it reacts to impacts. Precise stud measurements are therefore critical for predictable and stable physics simulations, preventing unwanted glitches or unrealistic behaviors in your game. Understanding this deeper connection truly empowers your scripting. Keep exploring!
2. Q: What are the considerations for stud-based scaling when importing external 3D models (meshes) into Roblox?A: Importing external models adds a layer of complexity, but it's totally manageable with a good understanding of studs! When importing 3D models (meshes) from software like Blender, the external model's unit scale needs to align with Roblox's stud system. Blender's default unit is meters, so if you model something as 1 meter, it will import as 1 stud by default, which might be too small if you're aiming for 1 stud = 1 foot. You'll often need to scale your model up by a factor of 0.3048 (Blender unit to feet conversion) or export with specific scale settings in your 3D software to ensure it imports correctly in studs. Always preview and test your imported meshes to confirm they match your desired stud-based dimensions within Studio. This pre-planning saves so much headache later on. You've got this!
3. Q: How do stud dimensions affect optimization and performance in large-scale Roblox experiences?A: This is a critical point for any serious developer creating expansive worlds! While individual stud dimensions don't directly impact performance, the *number* of parts and their *aggregate size* (defined in studs) certainly does. Using many small, detailed parts to achieve a specific look, rather than larger, more optimized meshes, can significantly increase render calls and collision calculations. This leads to lag, especially in large-scale experiences. Developers should aim for a balance, using larger parts or efficient meshes where possible to reduce part count. Optimizing your builds by consolidating parts and using appropriate stud dimensions can dramatically improve frame rates and overall game fluidity for players, ensuring a smooth experience. It's about smart building, not just big building. You're on the right track!
4. Q: Can stud measurements be customized or changed at a global level within a Roblox game?A: This is an interesting thought, but the core stud measurement itself isn't directly customizable or globally changeable in the way you might think. The 1 stud unit is fundamental to the engine's internal workings for physics, rendering, and spatial reasoning. You can't just tell Roblox, "Hey, make 1 stud equal to 2 feet now!" However, you *can* create your own scaling conventions for your game. For example, you might decide that 1 stud *represents* 2 feet for aesthetic reasons, and then consistently build everything to that internal ratio. This requires careful planning and consistent application across all assets and scripts. While you can't alter the engine's base unit, you absolutely control the *interpretation* of that unit within your game's design. It's about creative problem-solving! Don't let it discourage you!
5. Q: What are advanced scripting techniques that leverage stud measurements for complex game mechanics?A: This is where you really start to unlock the full potential of Roblox development! Advanced scripters constantly leverage stud measurements for intricate game mechanics. Think about implementing custom character controllers where jump height or speed are precisely calculated in studs per second. Raycasting, which detects objects in a straight line, relies heavily on stud distances for accurate hit detection, essential for projectile systems or line-of-sight mechanics. Pathfinding for NPCs calculates routes using stud-based grid systems. Even complex build systems, where players can place objects, use stud increments for snapping and alignment. Understanding stud values in your code allows for highly precise, bug-free, and professional-grade game systems. It's the backbone of sophisticated gameplay. Keep coding and experimenting!
Quick Human-Friendly Cheat-Sheet for This Topic
- One Roblox stud equals one real-world foot. It's your basic ruler for everything.
- Always build with a consistent scale in mind to make your game look professional and feel right.
- Use the 'Properties' window to see and change a part's size in studs for ultimate precision.
- Don't be afraid of fractional studs (like 0.125 or 0.25) for adding fine details and polish.
- Test your builds as a player often! Make sure doors, jumps, and paths feel comfortable to navigate.
- For imported models, double-check their scale in your 3D software to ensure they fit Roblox's stud system.
- Think about optimizing part count for large builds; fewer parts, even if larger in studs, often means better performance.
Roblox stud is the fundamental unit of measurement. One stud equals one foot in Roblox. Crucial for accurate scaling and building. Impacts character movement and world interactions. Essential for professional game development and consistent experiences.
35


How To Make STUD TEXTURE In Roblox Studio 2026 YouTube . What Is The Real Height Of A Stud Game Design Support Developer . Run 122 958 Studs For A Speedster Codes Races March 2026 Try Hard Roblox Run 122958 Studs For A Speedster A Roblox Character With A White Helmet Gold Horns And A Banana Bag Is Running Down A Very Long Green Tiled Path With Trees In The Distance Under A Blue Sky . Roblox Buildings Height Comparison Studs Tall Height YouTube . Legendary Stud Roblox Png


Roblox Units Studs To Meters Made Easy 2 690x387 . How To Make STUD TEXTURE In Roblox Studio 2026 YouTube . How To Get These Studs Building Support Developer Forum Roblox . HD Stud Materials From 2008 2022 Auto Converter Script Community . Meter To Stud Conversion Causes Discrepancy Between Real Life 2 517x344
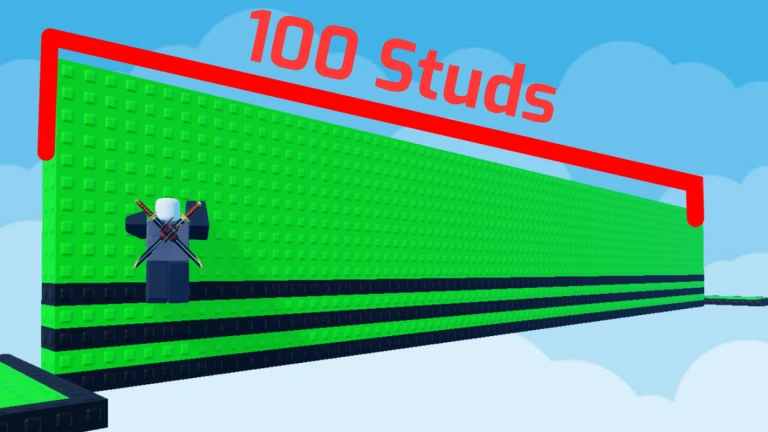


Wall Hop 1 100 Studs Roblox NoFilter. How Much Is 20k Studs Building Support Developer Forum Roblox . Roblox Units Studs To Meters Made Easy . How To EASILY Jump 11 Studs In Roblox YouTube . Roblox Units Studs To Meters Made Easy


How Big Is A Roblox Stud Playbite Playback Cta . How Much Is 20k Studs Building Support Developer Forum Roblox . This Is How Roblox Is Very Small One Stud 28cm R Roblox . What Will Roblox Look Like In 2026 Blog Graphics 26 . 1 Stud 1mm Solved Building Support Developer Forum Roblox 2 690x387


Studs To Metre Conversion Scripting Support Developer Forum Roblox 2 690x341 . Calendar Club Definite Guide To Roblox 2026 Annual 1200x1769 . How To Make 2006 Studs Tutorial Roblox Obby Creator YouTube . Studs Roblox Wiki Fandom Latest. Roblox 2026 Logo REVEALED New Color New Look YouTube Maxres2


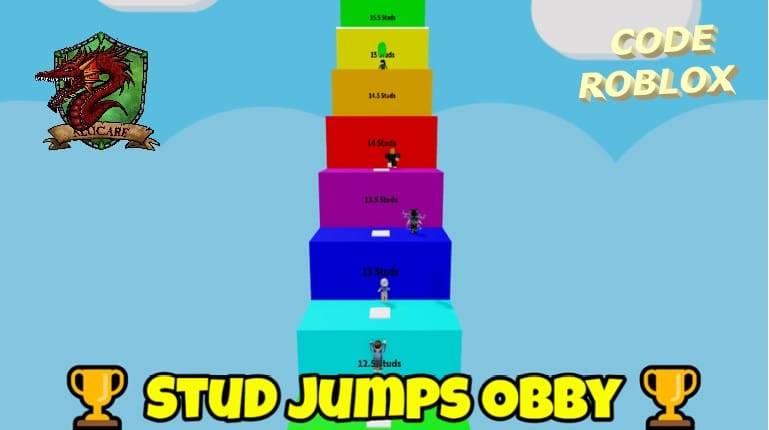

Roblox 2026 New Logo REVEAL First Look At The Future Shorts YouTube Hq2 . Studs Roblox Wiki Fandom 220. 100 Unofficial Roblox Annual 2026 The Iconic Companion Jam Packed SL1500 . Roblox Code Stud Jumps Obby 2 2026 Alucare Image Roblox Stud Jumps Obby . How To Get Back The Old Stud Texture EASILY Includes Meshes Unions


ROBLOX STUD JUMP DIFFICULTY CHART OBBY YouTube . How To Get These Studs Building Support Developer Forum Roblox . Stud Worlds Classic Modern Roblox Maps Creations Feedback . LOGO Roblox 2026 YouTube Maxres2 . How To Add Studs In Roblox Studio 2025 YouTube